| For several months, my car had been hesitating about half
a second after I turned the key before the starter reacted. Finally one
morning, it wouldn�t quit spinning after the engine cranked. The relay
had stuck in the closed position. Sometimes the car just won't turn over
at all. The starter relay needs to be replaced to cure these problems,
make sure it's not a dead battery first though! This install is on my '92
TT 5spd. Supposedly the automatic is slightly different.
Parts Required:
Starter Inhibitor Relay: PN: 25230-89981 (1.)
Procedure:
1. Disconnect the negative terminal from the battery and make sure it
is secure enough that it cannot slip and make contact with the battery
post. Fold a clean rag (do NOT use an oily rag) in half a few times and
place it on top of the negative terminal to keep the wire from coming back
in contact with the terminal.
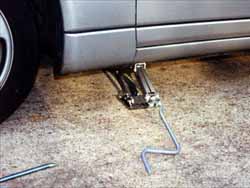
2. Pull the e-brake. Loosen the lugs a little on the driver side front
wheel, then jack up that corner of the car. If using the OEM jack, be sure
to place it in the appropriate position so as not to crimp the bottom lip
of the vehicle (refer to owner�s manual if not sure on this point) (2.).
Lift the car high enough to get the wheel off.
Note: I have heard some people have successfully done this procedure
by turning the wheels hard right, opening up area in the rear of the well.
I didn�t try this since I had never changed one before. I can now see that
it could be done that way, but if I had it to do again, I�d personally
still remove the wheel. Besides, this allows inspection of other areas
not seen everyday.
3. Remove the screws (red dots in 3.) (3 x phillips) to allow
access to the area behind the fender well liner.
Note: If fender well liner won�t flex enough to allow access,
also pop out some of the plastic rivets in adjacent panel in order to make
access easier. The plastic rivets will likely break if removed. To properly
remove them, push the center pin inwards and it should pop free. they can
be replaced with similar push-in style fasteners from a local auto parts
store or call Courtesy for direct replacements.
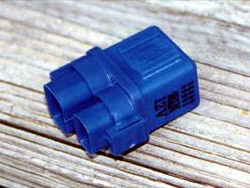
4. Just behind the round black canister is the Inhibitor Relay (red
dot in 4.). Without a light shining up in there, it is tough to
see. Fortunately it is bright blue. Once located, pry the thin square frame
tab in the middle of it away from the relay (look at the new and notice
the slightly raised square boss). This will allow the relay to be pulled
down out of the holder. It doesn�t take much pressure to pry the tab up,
a fingernail works fine. Luckily there is only one tab here, unlike most
other modules with them on both sides.
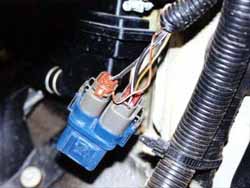
5. Slide the relay down towards the ground and pull the complete assembly
through the surrounding wires carefully to allow complete access. All of
this wiring is very flexible so it shouldn�t be hard to do.
6. Remove the relay by pulling on the connectors and the relay itself,
not by pulling on the cables.
7. Replace the old unit with the new one and go backwards through the
removal steps to complete the installation. Make sure to torque the lug
nuts back to 80 ft-lbs in a criss-cross fashion.
Sweep
Back to TECH |