Background:
The dealer had already isolated my erratic idling (750-1800rpm when
warm), so instead of paying the two hours labor for the dealer to replace
my IAA unit, I decided to try my luck and found out it wasn't as hard as
I thought. The IAA is made up of the IACV-AAC (Idle Air Control Valve -
Auxiliary Air Control) valve, the idle adjust screw, and the IACV-FICD
solenoid. Fortunately you don't have to remember all this because it comes
in one unit. The IAA controls idle and compensates for cold engine starts
and pressure changes. Work was performed on (& corresponding part numbers
are for) a 1993 Twin Turbo.
Timing:
As required. When idling becomes erratic and can no longer be adjusted
using the idle adjusting screw.
Parts:
AAC Valve Assembly. P/N: 23781-40P10 (~$215 from Courtesy)
AAC Gasket. P/N: 23785-40F00 (~$1 from Courtesy)
Blanket or towel to protect the front quarter-panel from scratches
Zip ties
Installation:
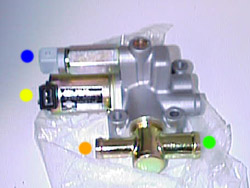
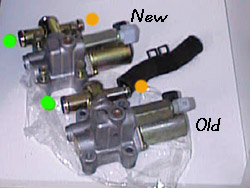
1. Look at the new AAC valve assembly (1.). There are 9 features
you need to familiarize yourself with. The two hose attachments, the two
electrical connections, the four bolt through holes, and idle adjusting
screw.
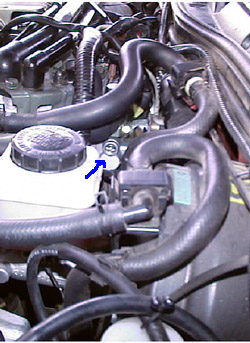
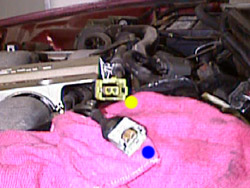
2. Open the hood and drape a blanket or towel over the driver's side
quarter-panel to prevent scratches to the paint. The Idle Air Adjusting
(IAA) Unit is located on the driver's side just behind the manifold and
just inboard of the master brake cylinder (2.). The idle adjust
screw is most easily visible.
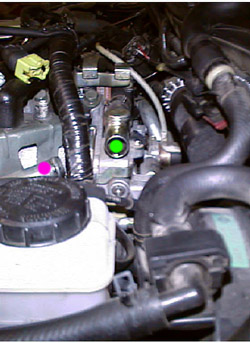
3. Start removing air hoses one at a time to gain access to the IAA
unit. You may need to unplug the plug wire going to the back cylinder and
there is a ground bolt that may need to be undone to ease access. Once
you get down the unit, remove the short hose between the IAA unit and the
tube between the master brake cylinder and the manifold (3.). Zip
ties may be useful to hold hoses and wires back out of the way.
4. Reach down and unplug the two electrical connections attached to
the IACV-AAC valve (black male connector, yellow female connector) and
the solenoid (light blue connectors). These connectors have wire retention
clips which do not need to be removed. A little bit and patience and gentle
prying with a screwdriver will get these out eventually.
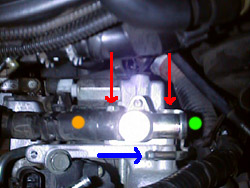
5. Once the electrical connections are removed, all that's left is one
hose and 4 bolts. The red arrows (4.) show the two top bolts that
are easy to get to with a 3/8" socket wrench with a 10mm socket. There
are two other bolts below that require a little more coercing to get out.
You may need to change to a smaller 1/4" socket wrench also with a 10mm
socket.
6. The blue arrow (4.) is a tube that needs be ben back towards
the driver's side once the top bolts are removed. I had no issues bending
this, just be gentle.
7. Once all bolts are removed, pull the unit out and the last hose should
work itself free.
8. Take the old part and compare it against the new part (5.).
There should be no physical difference.
9. Pull out the new gasket and apply a light coat of grease to both
sides. This will allow it to adhere to the IAA unit during installation
(6.). Put the gasket on the IAA unit and attach the short straight
hose to the unit.
10. Before reinstallation, take an opportunity to clean the solenoid
and the IACV-AAC connectors (7.). I use WD40 and a small paintbrush.
Make sure the connectors are completely dry before reattached.
11. Reassemble in reverse order. Put all four bolts in fingertight before
using a socket wrench to tighten them. Make sure that the gasket is still
aligned during installation.
12. Once all hoses, wires, and bolts are back in place, remove all rags
and tools from the engine bay. Start the car and let it get warm (a short
drive perhaps). Upon return, open the hood and turn the idle adjusting
screw counterclockwise to increase idle, clockwise to reduce idle. Z's
with manual transmissions (TT or NA) should idle at 700 +/- 50 rpm. Automatics
should idle 50-70 rpm higher when put in neutral. The engine will tend
to idle no lower that 700 rpm, so I would suggest turning the screw counterclockwise
until the rpms just slight start to rise.
Steven(Phx)
|