| I firmly believe that if you want to get brighter fog lamps
the most economical solution is to remove the glare guards. I suggest this
before you spend $$$ on expensive high wattage bulbs, try this and see
if it is to your liking.
Tools:
10 mm socket & driver (small)
various size pliers
Phillips & flat head screwdrivers
Preparation:
If you have a service manual I strongly urge using it and reference
the Fog Lamp Housing Removal Procedure Diagram. This procedure assumes
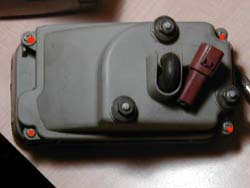
you already know how to remove the fog lamp housings. If not, here is a
picture of the fog lamp housing from behind the front fascia (red dots
in 1.). Notice there are three 10 mm nuts that need to be removed
before the fog light housing can be pushed out through the front fascia.
Also notice the red electrical connector. Using the snap that is on it
you will carefully activate it with pliers to remove the connection to
work on the housing away from the Z. It is much easier to remove the electrical
connector before loosening and removing the 10 mm nuts.
Procedure:
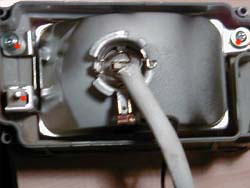
1. After removing the housing from the Z, open it. There are four phillips
head screws on the back of the housing. Remove them with a screwdriver
(red dots in 2.).
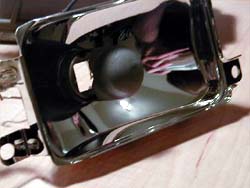
2. With the housing open, remove the 2 screws with the clear silicone
rubber rings below them. And from the front of the housing unscrew the
alignment fixture (red dots in 3.). Pull the reflector assembly
from the front of the housing.
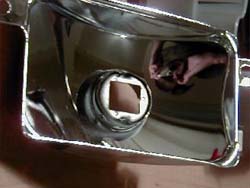
3. Remove the H3 bulb from the reflector piece. This is mainly so not
break the bulb when removing the glare guard. It is held in place via a
bent metal piece. Unhook the metal piece and gently pull the bulb from
the reflector assembly. (4.)
Try not to touch the glass of the bulb with your hands or get any contaminants
on the bulb. Contamination shortens the life span of the bulb.
4. At this point you could also change out the bulb to a higher wattage
bulb if desired.
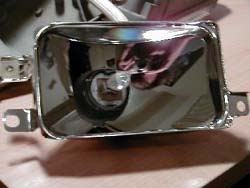
5. Using one of the various size pliers, work the glare guard off of
the reflector. The guard is bendable metal and can be deformed as it's
worked on - which is OK. I found using a smaller flat head screwdriver
to pry the circular section away from the reflector at its crimp points
works well. Then just pull the guard straight off with the pliers.
These pictures show the glare guard being cut at the location of the
ring. Either way is fine. Just be careful to not scratch or damage the
reflector piece regardless of the method you use (5.).
After its removed, replace the bulb and reassemble the housing (6.).
Be sure to clean the bulbs with alcohol and let dry in case they got contamination
on them during the procedure.
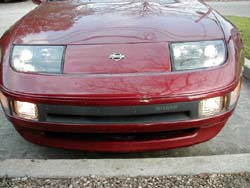
The Effect:
Comparison (7.). The picture shows one of the bulbs with the
guard removed and the other stock. I just did this procedure for Bill (SilverTTZ
- Pottsville) at the ECZA meeting and I gotta tell you this picture doesn't
do it justice.
Final (8.). Even with the stock fog bulbs it is at least 50%
brighter without the guard.
Article from  by zippin, pics
by richk.
by zippin, pics
by richk.
Back
to TECH |