| This is a simple procedure to clean and rebuild the AIV
valves. It may or may not get rid of the gurgling sound, but if a small
(1/4") hole is drilled in the bottom of the hose leading to the air filter,
it has been shown to eliminate the gurgling.
- buzzsaw & amp26
Tools:
10 mm socket
Phillips screwdriver
Drill w/ circular brass wire grinder/sander
Small palm sander or sandpaper
Procedure:
1. Jack up the car and remove the wheel. Follow all normal safety procedures
- jack stand, blocks, etc.
2. Locate the removable section of the fender liner. It's located directly
behind the tire tread and measures roughly 18" high x 12" wide. It's embossed
with some 1" high part numbers in reverse.
3. Remove 3, 10mm bolts. Remove the reusable plastic fastener by pushing
its center pin about 1/8" until it clicks. Use a flat screwdriver to pry
it out. When reusing it later, remove the pin, insert the fastener, then
push the pin back in.
4. Remove the fender liner.
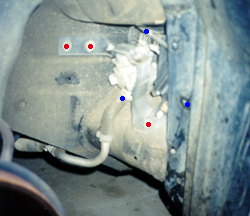
5. Loosen the clamp and slide off the hose going to the aluminum bodied
AIV valve. Do the same for the intake hose going into the black plastic
air cleaner housing. (1. shows hoses in blue dots, including vacuum
hose)
6. Remove 3, 10mm bolts holding the black painted bracket assembly to
the car. Remove the 10mm bolt holding the top of the air cleaner to the
car. (1. shows visible bolts in red dots. top bolt is hidden behind
other liner)
7. Move the assembly forward to disconnect the vacuum hose going to
the top of the AIV valve. (1. top blue dot.)
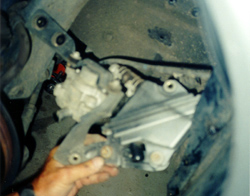
8. Remove the assembly from the car. (2. shows us pulling it
from the car)
9. Remove the rest of the bolts holding the AIV valve and air cleaner
housing to the bracket.
10. Remove the 4 screws to open the air cleaner. Note the tab on the
air cleaner and notch on the housing to properly orient the new (or reused)
air cleaner element.
11. Remove the 4 screws holding the two halves of the AIV unit together.
(Make a mental note of how the unit comes apart, specifically remember
the two hoses ends. The two hoses should be opposite of one another.
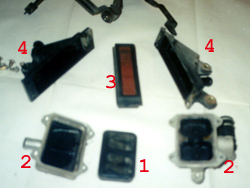
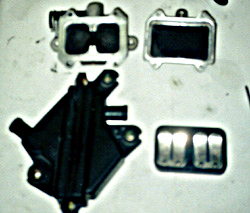
12. Once everything is apart, it should look like 3. Lookup the
corresponding numbers to find cleaning procedure. Find the numbers under
replacing to install new parts.
13. There are two options at this point, cleaning the reed valves, or
replacing them: If replacement is the chosen option, skip to step #17 now,
or continue for the cleaning option.
14. This is the rubber back piece with reed valves and metal stops screwed
into it (3. part #1). Unscrew the two screws and take metal reed
valves and stoppers out. Spray some solvent such as carb cleaner on all
the metal tongues and use the brass wire drill end to completely remove
all carbon deposits. Be patient, it will all come off until the pieces
are shiny metal again. Use a palm sander (or similar tool / hand sandpaper)
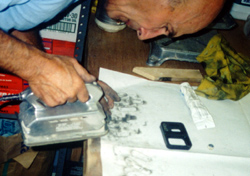
to sand down any part around the valve seal raised above the rest (4.).
Just sand a little, get the valves to have as flat a seat as possible on
the rubber. Keep placing valves on the rubber until a good enough fit is
attained, it might not be completely flat, that's ok. Clean rubber valve
seat with some kind of solvent. Reassemble plastic block by screwing reed
valves and stoppers back into position.
15. This is the AIV valve housing (3. part #2). using a solvent
(carb cleaner), remove any carbon BUILDUP. The inside can be cleaned, but
doesn't matter. Just make sure all the loose black buildup is cleaned out.
Make sure the circular hose passageways are clean of any loose deposits.
16. skip to step 18.
17. Unscrew reed valves (3. part #1) and clean rubber seal using
process above. Install new reed valves in place of old. PN - 14845-30P00.
18. I sprayed some simple car wash mixture all over the filter (3.
part #3), held a hose right up to it and cleaned any yellowish liquid out
of the filter. I sprayed until the water coming out was clear again. After
thoroughly washed, leave out in sun to dry or use a blow dryer if time
is important. Or replace the filter. PN - (not sure).
19. The air box doesn't really get too dirty (3. part #4), but
it will have residue from the yellow liquid on the insides. I just used
the same carb cleaner again on the inside and wiped clean with 2 paper
towels. Pretty much any plastsic cleaner will do here. Put the filter in
the air box. Line up the half circle notch to fit it the right way.
20. Once all the parts are back cleaned, reassemble the smaller units
and then reassemble everything back onto the black bracket. (5.)
21. Reattach vacuum hose to the top of the AIV assembly.
22. Push back into place behind fender. Fit the two hoses back where
they belong and all the screw holes should line up.
23. In order to stop the 'gurgling' from condensation filling up the
bottom of the assembly, the easiest place to drill is the lowest point
in the whole assembly. This point is where the black rubber hose attaches
to the air filter box. Right at the low point in the hose once the assembly
is reinstalled, it is your option to place a 1/4" hole in the bottom of
the hose to drain the condensation.
Note: We have done one side with this step and one side without, and
the side without the hole started gurgling again 2 days later. Your choice.
24. Replace the assembly and replace fender guard.
25. Reattach wheel and follow normal procedures to finish up.
REV 10-1-99
buzzsaw & amp26.
Information adapted from FAQ section article by Jim Klubens.
Back
to TECH |