| (Reposting due to broken image links from my original post back in 2005 that is in the FAQ. Please VTF so it will be there to replace existing one.) Search Terms: alternator, alt., replace, replacement, replacing, removing, belt, installation, installing Timing:
This is usually obvious as you have probably been left stranded someplace when your alternator has died. However, other warning signs could be the Brake, Lights, Battery, and Anti-Lock lights are all illuminated on your dash at once, or begin to flicker or dim. Once this happens your alternator is most likely on its way out and needs to be replaced soon before it completely drains your battery. If you want further confirmation drive your car to your local Pepboys, Autozone, etc. and have them test your alternator. Tools Needed:
8mm wrench
10mm wrench (ratcheting wrench highly recommended)
12mm wrench (ratcheting wrench highly recommended)
17mm wrench
1/2" ratchet
6" 1/2" extension
14mm socket
Floor jack
Two 2" x 6" at least 10" long (for driving the front tires on to elevate the car so the floor jack can get under it from the front)
2 Jack stands or ramps
Split ring lock washers: sizes; one@10mm 10 and one @ 8mm 8 (~ 50¢ at Home Depot)
Work light(s) (snaking Dewalt Spot light highly recommended)
Note: Your level of frustration will be directly proportional to the amount of light you have, so have plenty. Estimated Time to do job:
~2 hours including clean up your first time. Although allow a day or two to be without your car if you are going to have your alternator rebuilt locally after you remove it to save $$. 
1. First, drive your car onto the pieces of wood or similar elevation. This is to allow room later for sliding the floor jack under the car from the front without hitting the spoiler. Set parking brake, then jack the car high enough to put jack stands under each side. 2. Disconnect negative battery cable. 3. Slide under the car feet first. 4. Position work lights appropriately 5. Remove the rear engine underbody cover if you have one. Six 10mm bolts.
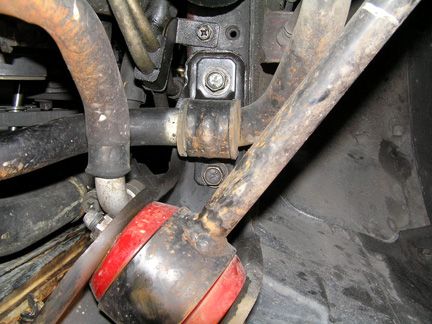
6. Remove front sway bar brackets using the 6" extension and the 14mm socket. Be careful not to let the brackets fall and hit you in the eye when you remove the bolts. =) Then slide sway bar towards the front and down. 7. Remove the radiator hose bracket (10mm wrench) 8. Note the tightness of the alternator belt by pushing your finger at the midspan and the relative position of the "Hole bolt" and Adjustment bolt. Remembering this will allow you a good belt tightening starting point on reinstallation and save some time.
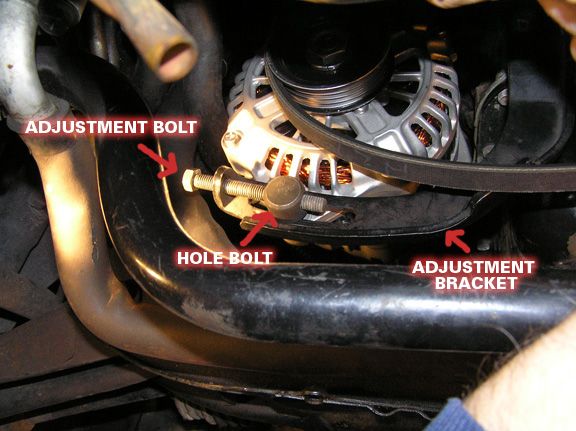
9. Remove "Hole bolt" washers and nut (12mm wrench) from back of adjustment bracket. (turn clockwise to loosen as bolt head faces away from you.) Ratcheting wrench will make short work of this task.
10. Remove Adjusting bolt (12mm) from "Hole bolt ". 11. Remove the adjustment bracket bolt using 12mm wrench.

12. Remove the pivot bolt from the top of the alternator using the 17mm wrench. Keep in mind that there is a nut on the back of the bolt which will fall off, so remember to retrieve it from the backside. 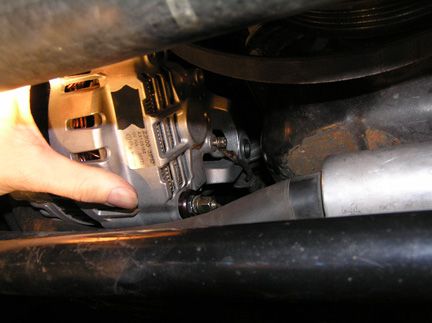
13. Pull alternator down and rotate to face pulley side towards U.S. passenger wheel to expose the two wire connections on the back. Use the 8mm wrench to loosen the ground wire, and the 10mm wrench to loosen the battery connection nut. Twisting the unit to get each connection point towards the floor as you disconnect the wire will give you the most clearance. 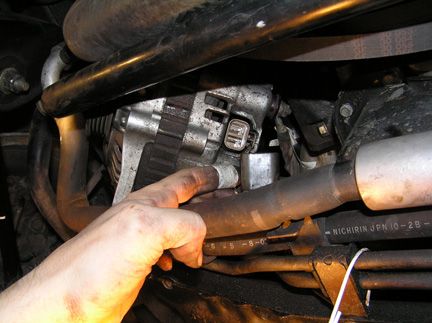
14. After the wires are disconnected, flip the unit upside down to expose the power connector. Grasp the connector firmly with your left hand and use your right thumb to depress the latch on the connector while pulling and wiggling from side to side on the connector to release it. Mine was really tight, so it may take some effort. 15. Push the radiator hose up and the sway bar back, towards the engine, and then remove the alternator at an angle sideways through the opening. 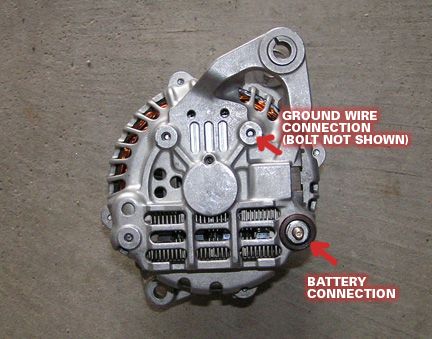
16. Take to your local Auto Electric shop for a rebuild or send it back as a "core" to the place you've already purchased a rebuilt alternator. A reputable local shop should be able to repair it or replace it cheaper than anyplace else. I got a remanufactured unit for $142. Otherwise you can contact an online vendor like Courtesy Nissan or your local dealer, but remember you'll have to pay shipping of the new unit as well as the return shipping of your old unit to get the "core" credit. Installation is basically the reverse of removal, however a few tips are noted below to speed the process. 17. Insert the new alt. at the same angle you used to remove it. 18. Once in place, tighten the ground wire, battery connection, and electrical connector in that order. Rotating the alt. to get the bolt you're trying to connect towards the floor will give you the most room to work with the wires. 19. Then slide alternator up into the "ears" and reinstall the pivot bolt, inserting the bolt above the power steering belt to allow room for a straight insertion. Don't worry about the nut on the back at this point, that will come last. 20. Next, reinstall the Adjustment bracket, inserting the bolt above the power steering belt to allow room for a straight insertion. 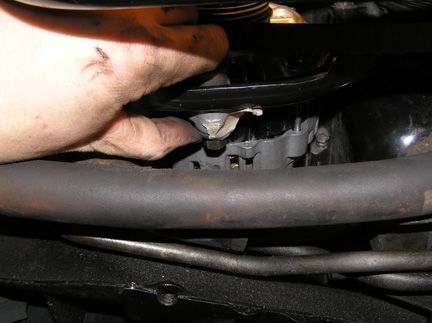
21. Install the Hole bolt, washer, lock washer, and nut next, tightening by hand for now at the closest point on the bracket towards the engine to allow room for putting the alternator belt back on. Also remember to rotate the nut on counterclockwise as the bolt head is facing away from you. If you have trouble keeping the washers on the bolt while you attempt to tighten the nut, use a piece of masking tape to hold the washers in place.

22. Now, you'll need to align the belt on the top pulley which will require you to get out from the car, open the hood, and manually put the belt on the top pulley behind the fan (pic). Then get back under the car and adjust the belt on the alt. pulley and slide the alternator away from the engine to tighten the slack in the belt. Tighten the hole bolt slightly to hold it in place while you insert the Adjustment bolt and tighten. 23. Adjust belt tightness to factory specs (7 - 8mm, about .28 inch, deflection at the center of the belt between the crank pulley and the alt. pulley with 22 pounds of force.) Then wrench tighten the adjustment bolt. Leave the hole bolt untightened because you will need to hand thread it into the locking nut on the backside. See step 25 below.
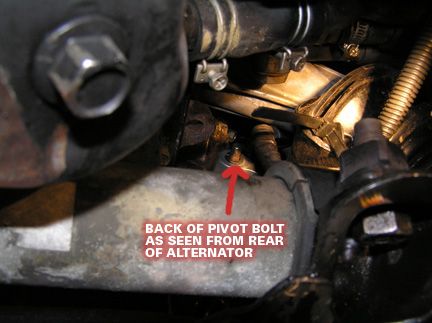
24. The hardest part of the job is saved for last, and that is reinstalling the nut on the back of the pivot bolt! I found this best accomplished by sliding out from car and then re-entering head first facing the back of the alternator so you can see the end of the bolt sticking out. Insert your left hand above the sway bar from the front of the alt. between it and the engine, and your right hand in the opening from the rear. It's a really tight fit and takes some good dexterity with your fingers and experimentation with forearm position to make it fit. 25. After multiple attempts, and time spent retrieving the nut each time I dropped it, I was eventually able to hold the nut with two fingers from my right hand and then use two fingers from my left to guide it to the bolt opening. Hold it there while using your left hand to thread the hole bolt into the nut hand tight. Once you've got it hand tight, use your ratchet to tighten it fully. This tedious task probably took 15 minutes, but if you've got small hands or exceptionally long fingers you may be able to do it quicker. 26. Reconnect the radiator hose bracket and the 4 sway bar bolts, engine undercover, and the battery cable and you're ready to go. Special thanks to member "ZUL8TR" who gave me some advice during my first attempt at this job. doug8867
|


 Alternator Removal and Installation Writeup -