| After seeing my success at finding an air leak using a DIY smoke machine in my post several days ago, several members shot me emails on how to build it so thought I would do a write-up on how I did mine. I'm sure there are other ways but below is what I used. I've listed the materials, cost, and where I they can be obtained. However you may be able to find these items from other sources as well and your costs may vary. Parts Needed:
- 1 quart paint can with lid - Lowes - $2.97
- 32 g or 34 g Nichrome wire - Ebay - $3.08
- insulated binding posts (2) - Radio Shack - $3.49
- Mini battery clamps (2) - comes in assorted electrical clips package at Harbor Freight - $2.99
- Mini alligator clips (2) - included in same package as Mini battery clamps from Harbor Freight
(Alternately you can use C butt splice connectors if you have some of those lying around. I had one so used it.)
- 20' of 14 g wire - Home Depot - $5
- 1/2" wide hurricane oil lamp wick - Ebay - $1.85
- 3/8 in ID x 1/4 in MIP brass adapter hose barb (3) - Lowes/Home Depot plumbing section - $2.38 each
- 3/8 in MIP x 1/4 in FIP brass bushing (2) - Lowes/Home Depot plumbing section - $2.38 each
- 3/8 ID x 10' vinyl tube - Lowes/Home Depot plumbing section - $2.80
- 1/2 Cut Washers (2) - Lowes/Home Depot - $.40
- Test-Tite 3" test plug - Grainger - $5.35
(Alternately you can use a Boost Pro boost leak tester if you have one of those already)
- Small bottle of baby oil Total cost: ~$39 Tools Needed:
- Drill
- 1/2" drill bit for hose barb holes, and 9/64" drill bit for binding post holes
- Adjustable wrench to tighten bushings
- Air compressor with regulator and hand held attachment
- Soldering iron or crimping tool to attach alligator clips and battery clamps to wire.
- Electrical tape to tape up connections
- Tube of silicone sealant for making barbs on paint can lid air tight. Here's a look at the completed product. 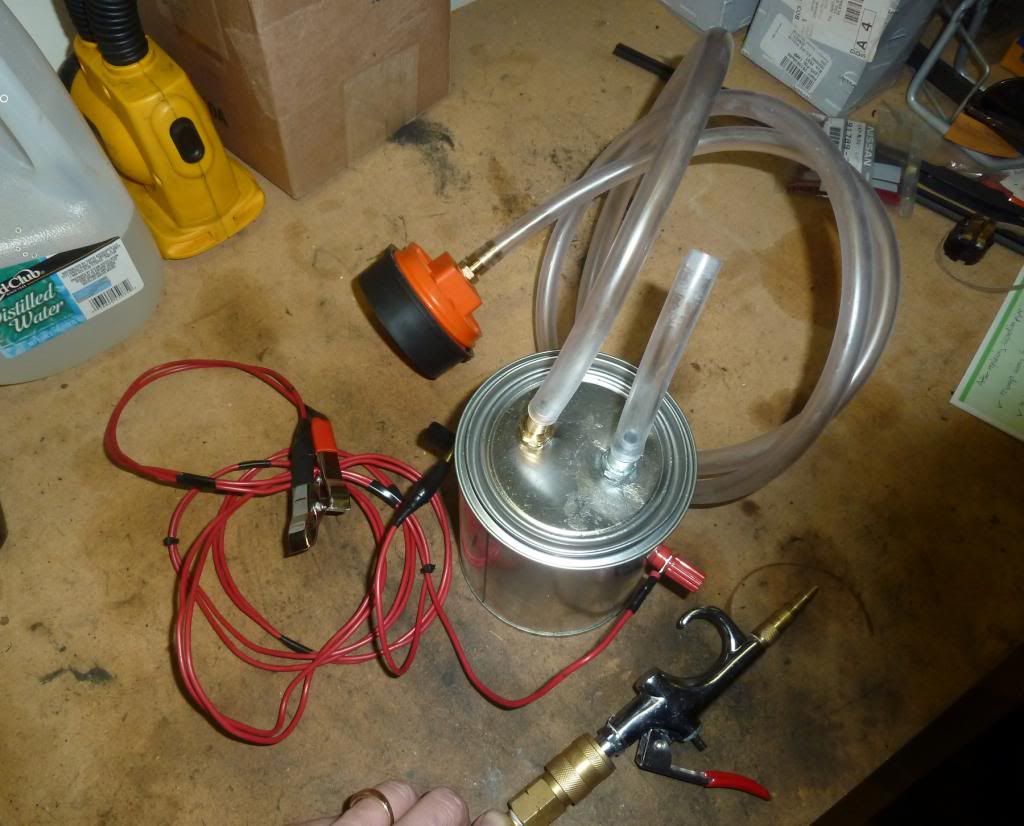
The paint can has 4 holes drilled in it. 2 on the lid for the hose barb fittings, and 2 on the side for the binding posts. The orange test plug has one 1/2" hole drilled in it. The barb simply screws into the hole tightly so nothing else is needed for this fitting. Here's a pic of how the barbs are attached on the underside using the sealant, washers and bushings.
(I had an extra NPT fitting laying around so used it instead of buying another hose barb.) 
Inside can showing wire that is wrapped a few times around the wick immersed in a shallow amount of baby oil and clipped on binding posts. This makes it easy to adjust the length of the wire. I found that the shorter the wire between the binding posts the hotter and quicker the wire became. If the wire length was too long between the posts then the wire did not get as hot and there wasn't as much smoke created. You may have to experiment to find your optimal length. When you hook up the wires from the binding posts to the battery, power is supplied and the wire glows red and smoke is created. 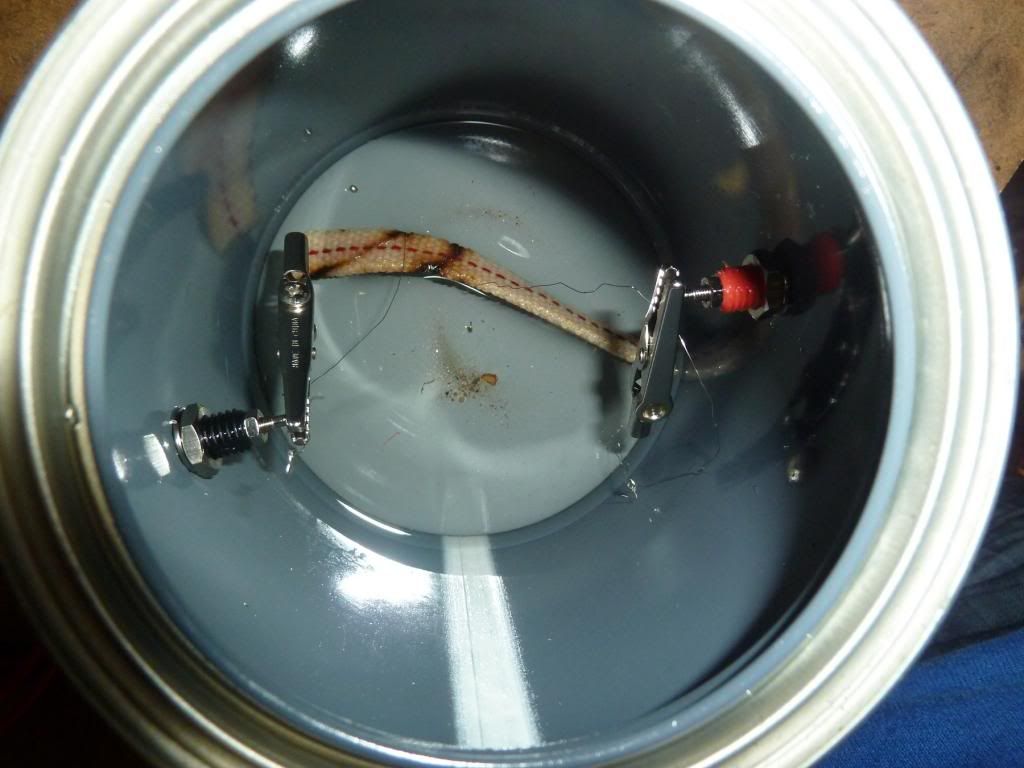
To use the machine: Wrap the wire around the wick a few times and then clamp it to each binding post. Pour in a shallow bath of baby oil just enough to barely cover most of the wick. Remove your nose panel and your air intake and MAF sensor. Then insert the test plug into the opening. Attach about 6' of vinyl tubing to the plug and run it to one of the barbs in the paint can lid. Attach the alligator clips or C butt splice connectors to the binding posts on the can and hook the battery clamps on the other end of the wires to your car battery. Be sure to connect positive to positive and negative to negative. You should see the wire glow red almost immediately. Wait a few moments for the wick to start smoking then put the lid on the can. When the machine is working optimally the wire will glow red hot and the can will fill with smoke within several seconds. When it is not working optimally, i.e. the wire is too long, it will not glow red and you will only get little wisps of smoke from the can. Set your air regulator on your compressor to about 7 psi. Insert the hand held nozzle into the 6" tubing attached to the top of the lid, and then squeeze as necessary to control the flow into your intake system to slowly move the smoke and look for any of wisps of it escaping from your engine bay. It may take 5 or 10 seconds for any wisps to appear. Remember, if you don't have any leaks you will NOT see any smoke. It takes about 25 seconds to fill the intake system on the Z so don't apply air pressure for longer than this continuously or you could risk damaging seals. If you don't see any leaks after 20 seconds stop applying pressure and remove the nozzle from the 6" inlet for a few seconds to let pressure dissipate. Open the lid on the can to ensure you're wick is still smoking, and then try again. If you don't see any smoke after 3 good tries it's safe to assume you don't have an air leak. The one I found on my car showed up after about 10 seconds on the first try. See the wisps of smoke coming up from between two large hoses, up by hood sensor and across fuel filter and hoses in pic below. 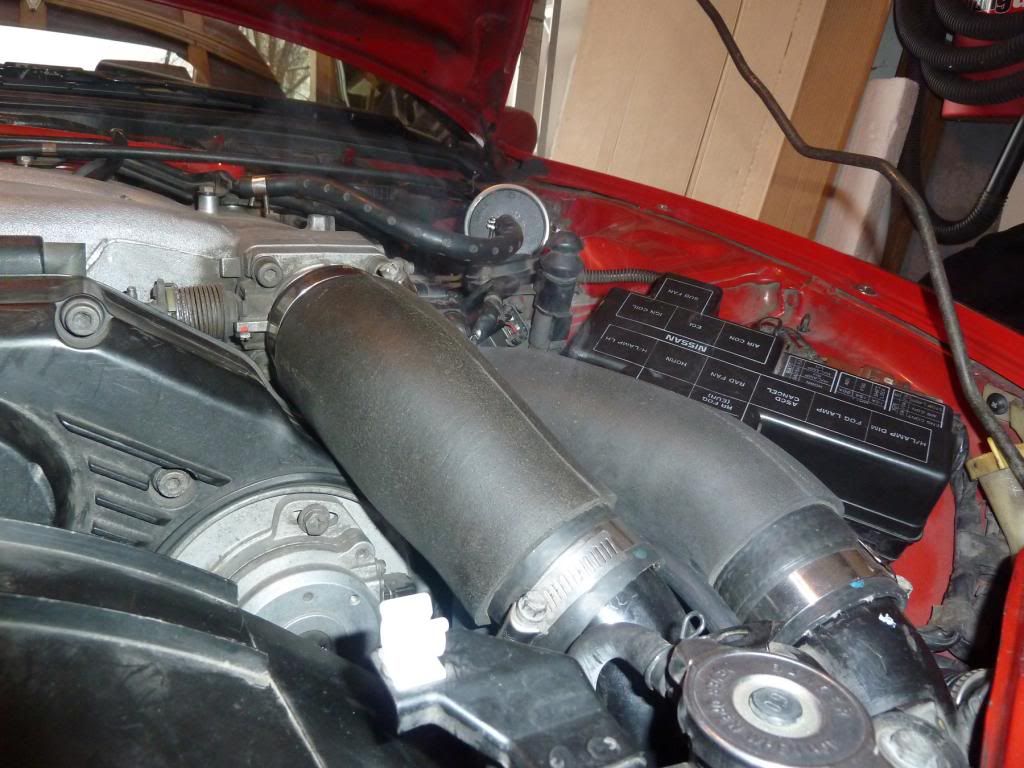
Since my particular leak was buried several hoses down in the engine, I conducted several more tests by removing the large hoses and capping off pipes with plastic bags secured by rubber bands to more specifically pinpoint the exact spot from the area where it was smoking by process of elimination.
Hope this helps. Cheers.
doug8867
|


 How to build a smoke machine to find air leaks -