| Radiator block test (Testing for head gasket leaks using a chemical block tester) This test uses a specific dye formula that changes its color when it comes in contact with hydro-carbons (exhaust gases) This diagnostic tool is very simple to use. I recently have been working on a customer's car that had some over heating issues and figured I would make a post to help some of you guys out if you ever needed to test for a head gasket leak.. This method is much faster than using a leakdown compression tester to test for a head gasket leak and actually is a little more accurate because a leakdown tester may not show a bad head gasket if the engine is not running/warm. 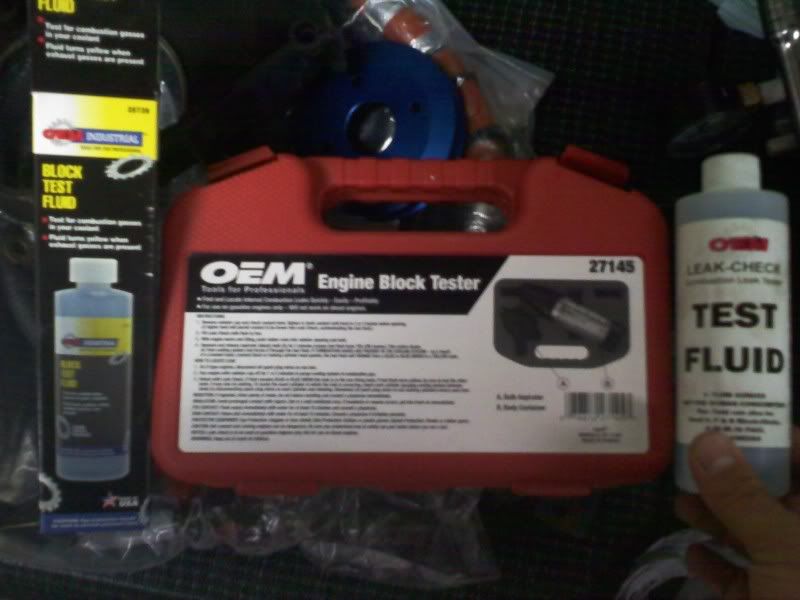
I rented this from my local Autozone for like $40. It comes with a bottle of the testing dye which is included. And once I return this .. I'll get my money back :) If you have problems overheating and have ruled out the normal items such as thermostat, water pump, clutch fan, blockages in overflow tube/tank, air pockets in cooling system and coolant levels. A bad head gasket may be the cause.
Symptoms of a failing head gasket is/are....
-Overheating -Steam (white) coming from exhaust (If the head gasket is damaged on an area which would cause a leakage of coolant INTO the combustion chambers). -Coolant have a brown milky color which looks like chocolate milk and is NOT internal coolant passage rust from a car sitting for a long period of time. (Oil leaking into coolant passages of block) -Engine oil having a frothy look to it (light/dark brown froth) (Coolant leaking into oil galleys of engine block) -Coolant hoses continually blowing off or apart. -Radiator bowed out from super high <100psi of cylinder pressures. 
Here is an example of an engine with an upgraded aluminum racing radiator that had very high coolant pressures/heat from a bad head gasket/over heating. 
Here is another example of a coolant hose that has expanded due to the high pressures/heat.
I am sure there are some other symptoms as well.. but these are the ones that came to my head first.
Make sure you have a 50/50 mix of coolant and anti-freeze.. having too much water can cause high pressures because the boiling temperature is lower than needed without coolant/anti-freeze. If it is winter time, you could risk cracking your block/heads from the water freezing and contracting/expanding. Not to mention the higher risk of having internal corrosion. Too much antifreeze/coolant can cause problems as well.
-WEAR YOUR EYE PROTECTION AND OTHER PPE!! -To use this diagnostic tool. Simply drain some coolant from your radiator. (from 2-5" from radiator fill neck). -Pour testing dye into testing tool until you reach the fill line.

-Start the (cold) engine and remove radiator cap. Let it run to where you just start to feel the engine feel warm or when the temp needle just starts moving from start point.
-Place tester firmly into radiator fill neck 
-Squeeze/release the plunger head to create a vacuum. You will see air bubbles when you create the suction needed. (keep doing this during the whole test) 
-Continue to let the engine run while pumping the plunger head. Continue to do so for up to 2-3 mins. It would help to raise the engine RPM (~2k rpm) a little bit while doing the test.. but do not hold it at a high rpm for a long perion of time. Just little revs is all you need which can be done with the throttle cable on plenum. 
If you see the dye change color to an yellowish tinge. You have a head gasket leak. If you see the level of the dye raise and change to green (coolant color).. the test is contaminated and must be done again. Try lowering the engine coolant level some and redo the test. 
Here is an example of where the dye found traces of hydro-carbons (exhaust gases in the cooling system) Like this. Changed from blue dye.. to a yellowish color= bad head gasket.
-Shut the engine off. ---------------------------------------------------IMPORTANT!!!!!!--------------------------------------------To VERIFY your test did not get contaminated with cooling system coolant due to an overflow of coolant/anti-freeze. Remove the tester and go to an area with fresh air. Squeeze and release the plunger ball. (allowing fresh air to enter the testing dye).. If the color changes back to its original color (blue).. It verifies that there were hydro-carbons present in your cooling system and now you have purged out all traces with fresh air. If the color does not change back to blue. It means the test has been contaminated with coolant. (do not reuse the dye once it has been used) 
Example of the dye that changed back to blue from a yellow state. Verifying that the cooling system has exhaust gases present.
I hope that this may help some of you guys out with trying to trouble-shoot a possible head gasket. Using this test is simple.. but I did do it a few times because I was unsure with the results at first.
_________________________________________________________________________
~~~ Sig starts below ~~~
=================================================================NO, This picture is not photoshopped.
AIM:Shawn300zxTT "-Any closeups on the nuts? - zboost(tx) 19:17:53 08/08/05
-Not really something you want to ask another man about... (n/m) - LordZ 19:24:00 08/08/05" "I just took 45 min and scrubbed the heck out of my rear"
teambushido(San Diego, CA) 19:24:51 12/11/04 -1991 Stage _ TT 5spd (Upgraded to hell and back)
-1990 Super White 2+2 Na Stage 3 Auto (Deceased :( )
-1990 Cherry Red Pearl ,Auto Coupe (Parts car)
-1990 11 Sec Eagle Talon Tsi AWD, (SOLD!)
-2001 Ford F-150 Crew cab, 5.4 Triton v8.. Tow bitch
-1997 Acura 2.2 CL, 5spd. Daily Driver.. great little car!
-2004 Honda CBR 600RR (Candy blue, FOR SALE) |


 HOW-TO: Using a chemical dye to diagnose a blown head gasket -