| "MY APOLOGIES FIRST OFF FOR THE LOSS OF PICTURES ON THE ORIGINAL POST, PHOTODUMP.ORG WENT DOWN SO i FIGURED I WOULD REHOST ALL MY HOW-TO'S. I REHOSTED ALL OF THE THESE AT THE REQUEST OF A FEW MEMBERS. THEY ARE NOW ALL SELF HOSTED SO NO ISSUES WITH LOOSING THEM NOW. THANKS FOR BEING PATIENT." ****************************************************************************** I have one passion when it comes to working on Z's, and that is cutting weight. Everyone know that about me, it's my personal OCD but other impulse has always been chassis stiffening. Now, there is a HUGE amount of poor information available which shares a bed with poor quality parts. We will attempt to shed a little bit of light about chassis stiffening options, tricks of the track running monkeys and parts that not many know about.
************************* ************************* ********
Understanding Why
First off we will begin mentioning the benefits of chassis stiffening. Chassis stiffening is nothing more that what it sounds like. You are stiffening the chassis or making it more rigid. In a sense the goal is for absolute rigidity...stiff as a board, if you can get it. The stiffer the chassis the more suspension energy is actually passed into your suspension components. This makes the predictability of later tuning your suspension that much more precise. It’s like building on a strong core in a sense. With the core strengthened, your chassis, you’ve lessened that amount of energy the chassis will see due to flexing thus throwing off your attempt to achieve the most optimum suspension setting.
But you have to remember all the structural components of a car; like overlapping sheet metal for better crash survivability and ease of body shop panel repair and replacement, preexisting overlapping sheet metal for strength around suspension components like strut towers areas, collapsing impact area sheet metal and other metal structures that are simply there to keep other objects from intruding into the cabin area where the most important thing is ...you. Remember that when a car is designed, I mean one meant for the roads, it has to be designed to protect the driver. If it doesn't protect the driver then it is deemed unsafe and will never see a public road. Couple this with the need for a person to have a vehicle repaired reasonable after impacts and you have a complication of things. Parts that need to be one whole piece, like cockpits. Other pieces that need to be removed easily if damaged in an impact. Ease of entry to the driver and passenger, etc. Now you begin to see the dance the designers have to play when designing a safe car for the masses. Now that you see a small fragment of what the designers go through, it's time to improve on "perfection". Add up car building costs, labor and profit margins into the mix and you get the full spectrum of complexity when making a car. Fortunately for us the Z32 was a kick butt giant killer that was ahead of it’s time, but now technology has passed us up but we get into that a little later. ************************* ************************* ********************* A Little History Lesson First This is where your parts vendors and tuners come in. So the Z32 goes on sale in the states in 89 against a beginning sales trend of Americans buying big huge SUV’s at the time. Fast forward a few years, and sales begin to dwindle for the Z32 as more and more soccer mom’s talk husbands out of buying Japanese supercars like the 300ZX. Eventually this kills off the Z32 for the US market and you know the rest. Unfortunately the high sales tags and small numbers over their run time didn’t leave a lot of vendors available to take suspension tuning to nearly where it should have been. What has brought the technology and parts development around for the Z32 was fans. Yes, fans like you and me made their own companies and started selling their own parts because frankly no one saw at is a profitable model to get into. Companies like SPL Parts, 300degree, Z1 motorsports and Powertrix were just made of guy Z32 lovers that wanted more out of their cars. Sometimes taking hints from Japanese markets and tuners, most of which have now all been gone due to economical issues. The realization of a market was there and here we stand today. ************************* ************************* ********************** Z32 Models and How They Differ 4 models were offered for the Z32. T-tops, 2+2 T-top models, convertibles and the much sought after base model slicktop. The T-top models were the most common, supplying the majority amount of this z32 style for the US. The T-top would also only be sold in a TT format as well. The only true flaw the T-top has is actually it’s difference between it and the base model. This made it heavier than it’s lighter little base model brother. The tops are a luxury, nothing more. With luxury comes compromise. To have T-tops in any vehicle, the structure of the roof must be reinforced in cases of rollover safety. Extra reinforcement meant loads of additional sheet metal was needed. This extra weight coupled with all the other luxury items available for the T-top model, made it much heavier than the base model. Also, the T-top doors are actually build with a more durable side intrusion beam in the doors as well, making them a bit heavier. The 2+2 model also offered itself in a T-top model but with a longer wheel base. Ideally the best Z32 chassis ever would have been a slicktop 2+2 for handling purpouses, but I have yet to ever see one in any other country. The convertible, is unfortunately the worst of all the chassis. Although it still handled better than most of it’s competition at the time. The convertible was the heaviest model Z32 ever produced as most convertibles are. The main problem with a convertible model is it’s design. Think of a car as a sliced loaf of bread still in a package, then in your mind, wrap paper around it’s body. Now twist the bread ever so slighty upward and you begin to get creases in the center. That in a very crude term in body flex. Now take all the slices of break and just the them in half, and throw them away. Rewrap the bread and try the example again and you get a much different result. You start to get the idea in a very very crude setup. BTW, I pre-apologize for the bread example but I am hungry so shut up. ? The slicktop was considered the base model 300zx at the time. Offered as a non-turbo only option, this was definitely the “base” model for us folks. But, and it’s a big but, the slicktop like most other car base models is the lightest and stiffest stock chassis Z32 ever made. The problem with the slicktop is it’s power. But we are talking about handling and not power, so we TT swaps out of our discussion at this time. So now you know the all the models and how they differ from one another. ************************* ************************* **********
Technology, R and D And Our Old Z32's
My father used to say “the worst thing about getting old is getting old”. The quote actually has some bearing here in our conversation. The Z32 chassis at it’s time was awesome. You could take that car out on a track and with a few mods be pretty damn competitive. Now that more than a decade of racing technology has seeped down into the auto production lines the Z32 has gone from standing on the podium to just being a competitive. It’s still impressive but like all of it’s other Japanese supercar bretheren, it’s getting older.
The main problem with the Z32 is the same problem it’s always had, it’s weight. Out of date sheet metal composites and heavier materials were the staple of our car, but still, at the time it was ground breaking. Now it’s weight actually has a lot to do with how the chassis responds. Take a pole and add 2 buckets on each end and just add 2lbs to each bucket. You begin to see the pole slightly flex. Now add a 5lb weight to each bucket and we begin to see even more flex. This measure is called deflection, and it’s how chassis rigidity is measured in most cases. The least amount of deflection, or flex, is our goal for this entire discussion. When weight is reduced throughout a chassis you will get less body roll and less deflection into the chassis. This is why I always harp about shaving weight where you can in the Z32. This car’s weight is transferred over plains, or invisible lines, into suspension components in all 4 corners of the car. This weight transfer mix with other things like G-forces and sheet metal torsion-ability, all come together to give chassis flex when applied to hard turns being taken at moderate to high speeds A lighter car means that the car is pulling less mass and able to accelerate and decelerate much quicker. Cars today are the lighter and stiffer than they’ve ever been thanks to technology, advancement in metals and metal shaping. And although you cannot change a tiger’s stripes, you can take a pair of clippers and shave the crap out of that tiger which is where we are going next. Let’s start shaving down a tiger. ************************* ************************* **************
Improving on Perfection with Bolt-ons
So what is available in the market right now? Z32 suspension guru’s like SPL and Powertrix have made and are in the works for a bevy of bolt on chassis stiffening options. Getting into the basics, we start with the most common item, strut tower braces.
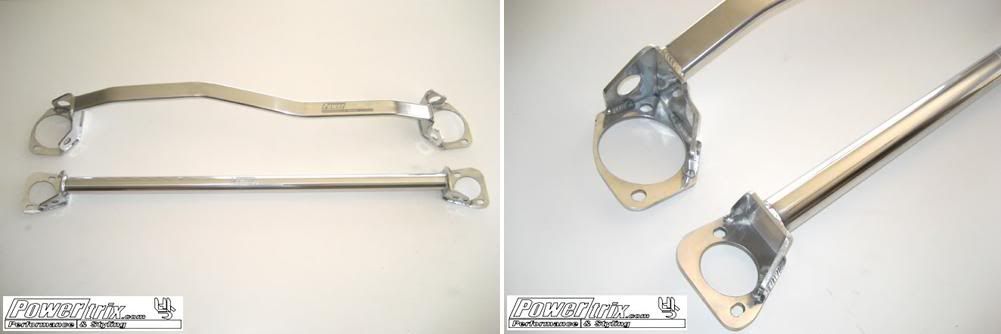
*pic courtesy of powertrix.com
The upper strut tower bar creates a bridge on the strut tower area from from left to right, essentially linking the two together. This bridge transfers torsion into one another and dissipates and deflection between the two. They are available in both front and rear applications. There are two different versions of strut tower bars; for solid one piece units and your 3 piece units. When at all possible a solid unit that travels lowest from strut tower point to strut tower point is best. This takes away some likely hood of the bar flexing in the center and also takes stress out of sometimes crappy nuts and bolts that are used to link a typical 3pc kit strut bar together. Carbing has, hands down, the best one ever made but is rather expensive. Powertrix has created their version at a fraction of the cost for those on a tighter budget. There are quite a few of the cheaper units available as they are all over eBay these days. Beware of fitment issues and rubbing as some cheaper units have been known for this.
*pic courtesy of SPLparts.com
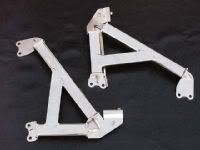
The fender brace for the Z32 is a not so well known bolt on chassis brace that doesn’t get the respect it deserves. In a unibody construction vehicle, or overlapping sections of body to make one whole unit, like the Z32 it’s best to improve on section to section connectivity. The fender brace actually links together each apron, the structural section of metal that runs from the headlight to beginning of the cockpit, with the cockpit area thus trying to make them one. Deflection on quick high elevation and low elevation hills can cause stress to the apron chassis region. The frame rails take most of the brunt of that upward and downward force but the defection is best seen and the connection from apron to cockpit section. The brace simply adds rigidity along the upper plain of that apron to the cockpit aiding in that type of particular deflection. This brace really does nothing for rigidity on turns but should not be left out your chassis stiffening plans. Some relocation of items are required depending on model, but otherwise instillation is very simple. 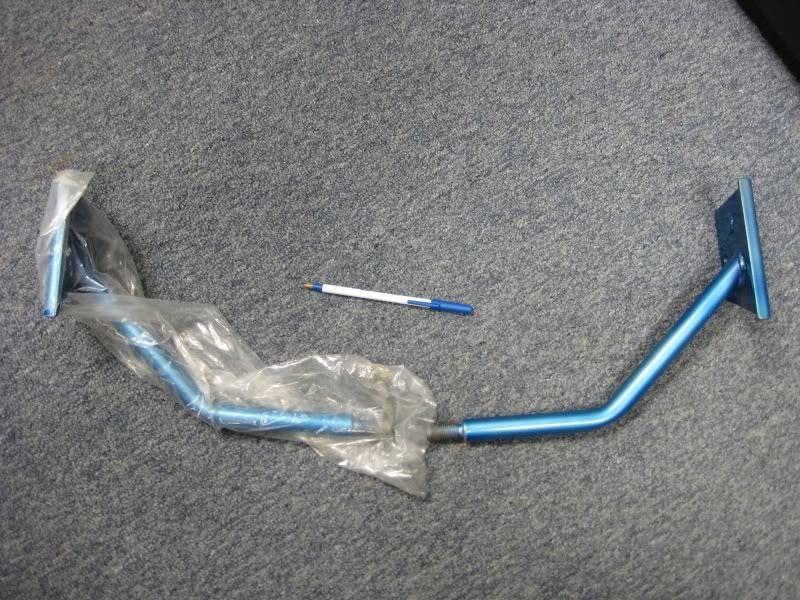
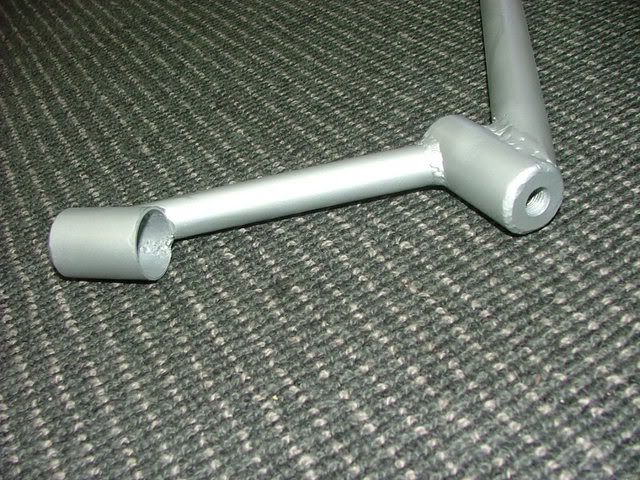
Rear ladder bars a mixed bag of BS, poor quality and bad information. There is gain to be had but it’s so very minimal that most vendor just never bothered picking them up. This bar fits in the rear lower most portion of the frame and bolts up to exactly the same area as the tow hooks. So, you have to eliminate your tow hooks to install this and use the bar as your tow hook. I personally had these bars and have had 2 of them. They fit like garbage most times and I yield really nothing from what I can tell from them. I personally say just weld in a bar from one rear frame rail to the other, that way you keep the stock tow hooks and call it a day. 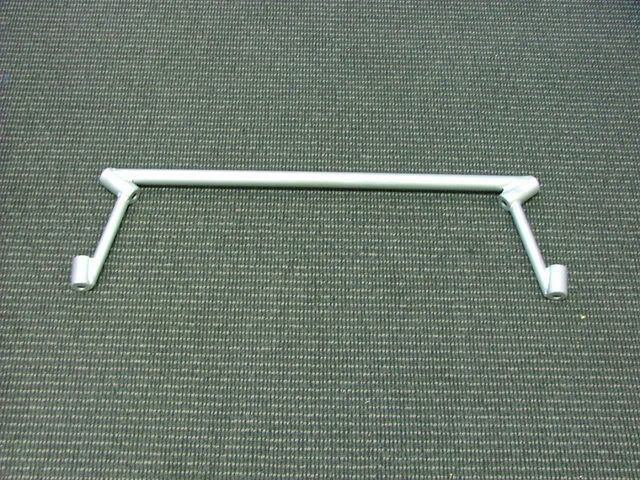
The lower front chassis bracing bar is a fairly new development for the Z32. Although it’s been around a year or so, it barely coming available for the masses. The lowest portion of the Z32 doesn’t have much cross bracing. Really you just have the cross member which is the strongest part pulling triple duty of bracing from left to right frame, holding the engine and hold the front suspension/steering components. The lower tie bar, called that because it normally “ties-in” one section of sheet metal to the other, supports all you cooling and AC components. This bar simply ties in all that together to assist in front chassis flex which should be mostly noticeable on the beginning of entry and beginning of the exits of high speed turns. There are two versions currently out right now. A basic style point to point bar that I think Sustec had designed. It’s has two major flaws; 1) due to it’s only real tightening section to be in the center it has a tendency to bind upwards causing some rubbing and 2) it rather flimsy with only a two point connection the additional flex causes it to rub even further upward. The other style is the UAS (Unique Auto Sports) version out of Australia. This is a great unit connection 4 solid points and is extremely well put together BUT it does have a problem as well. Being a “race only” type of part it can interfere with the aluminum AC lines. Also, both style units can cause it to rub against a hardline radiator hose. For those that run a silicone coolant hose this should just be an issue with trimming up the hose to make a bit more room for the brace. Other than these two issues, the UAS unit seems to win hands down over the single bar type. The availability for the UAS unit is still limited to the US for now, but keep in mind it is a “race only” type part and will need some minor customization to get into place. But the possibilities for front upward bracing should be realized. More to come on this as testing continues on this new part. ************************* ************************* **************
Seam Welding (aka, stitch welding) and Spot Welding
Stitch and spot welding a chassis can effectively increase the torsional rigidity of the car (reduces twisting) which will allow the suspension to be easier to tune and operate the way it is intended to. In an ideal world, the chassis must never absorb energy from the suspension, the chassis is supposed to be a solid structure for the suspension to mount onto. By having a solid structure you get much more predictability in the handling since the suspension is doing all of the work, in our perfect world. It is easier to tune a car when the suspension is the only thing deflecting and absorbing the impacts. It is much harder to tune a suspension when the chassis is flexing different amounts under different loads. Bracing a chassis with a front and/or rear strut tower braces and underbody braces are a good idea but these modifications cannot be fully utilized when it is still attached to a flexing chassis. The Z32 has some good bracing in some areas but could be definitely reinforced in some areas, like the front and rear strut tower areas.
First job is to locate the seam areas (the place that both different metal panel attach together) for welding and do spot welds with 1-inch intervals, alternating spot welds from the front to the rear of the car and also the left to the right to prevent any warping. Stitch welding strength doesn’t come from the addition of welding wire, but actually comes from the fusion of the sheet metal panels. Overall the whole stitch welding process uses around two pounds of wire for a medium sized car. The torsion rigidity gained from the addition of two pounds of material is much better than any strut tower brace or underbody brace can provide.
After the stitch welding procedure the car will have a lower degree of twist under a torsion load, there is no guarantee that the degrees of twist will decrease by X% as every car responds differently to the stitch welding process. Some cars are very poorly spot welded from the factory, while others are done very well, Also the overall age/condition of the car will determine how well it responds to stitch welding work.
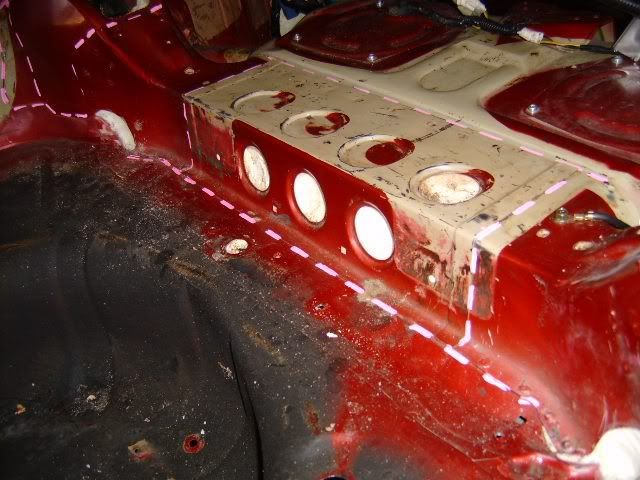
Being creative and knowing what you are doing plays a big part in doing the job right. I recommend conversing with a known and qualified welder who has some training in this type of scenario. Here a few pics of an S15 that has some work done while it’s on a rotisserie. These pics are from a HybridZ post. This will give you an idea of what I am talking about. Note the underbelly and interior "seam-like" welds, hence the name. 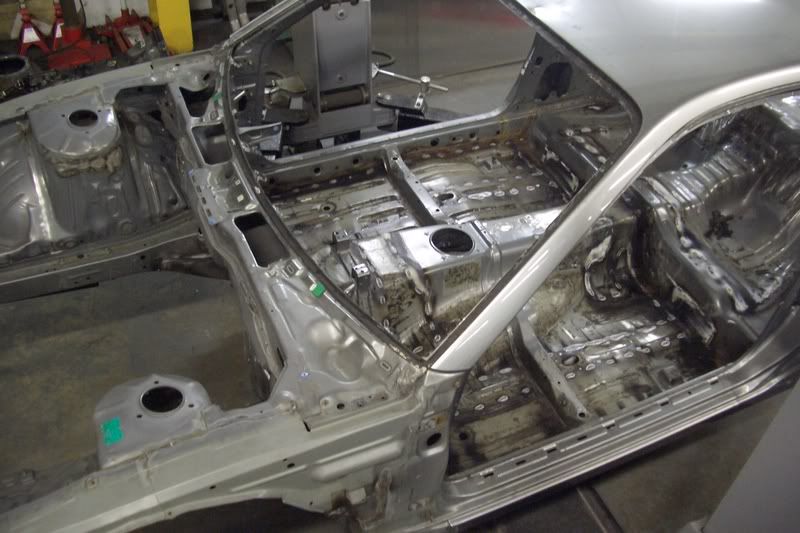
************************************************** **************
Structure Foam Injection - Tales Of Magic Foam Revisited.
Years ago when I looked into chassis stiffening, Mike Kojima from Sport Compact Car was already doing it for their 300ZX magazine project. I was so impressed with the well written article I figured I would just throw it up on here for those that never got the chance to glance through it. “In any high-performance car, it is impossible to make the chassis too stiff. The stiffer the chassis, the higher its natural frequency, making the energy imparted to it by bumps less likely to excite the body's structure. A stiffer chassis enables the use of stiffer springs and shocks without hurting the ride. This is because a stiff, non-flexing chassis transfers more force into the suspension where it can be dissipated by the springs and shocks instead of transferring the force to the occupants. A stiff chassis is also more responsive to roll rate tuning for balancing understeer and oversteer. This is one of the reasons why automotive engineers are continually investigating ways to stiffen chassis without adding weight. In a final bit of reengineering to stiffen the body, we injected the chassis with catalyzed rigid structural polyurethane foam. Structural foam, in the 2 lb per cubic foot density that we used, can stiffen chassis members up to 40 percent. Higher densities of foam can increase stiffness by up to 300 percent. Since we cannot retool custom parts to redo the Z's body, we figured that this would be an excellent, low-cost way of greatly increasing chassis stiffness. Injecting foam is not a new technique for chassis stiffening. The Infiniti Q45 uses this sort of foam in some of its chassis members to increase stiffness, as do a few other premium cars. In fact, the foam we chose is the foam recommended to repair damaged Q45s.” He also went on to mention “We were amazed at how this simple procedure improved the performance of the car. The chassis now almost feels like it has a roll cage. A sloped driveway can be driven up sideways with nary a creak. Even though the Z already has a pretty tight chassis, it feels more solid. The ride has improved and road noise has been reduced noticeably. We bet that the car will be even more responsive to chassis tuning measures in the future. If you are a slalom racer, a road racer, have a lowered car or even just want a smoother ride; foaming is a worthy, easy-to-do modification.””
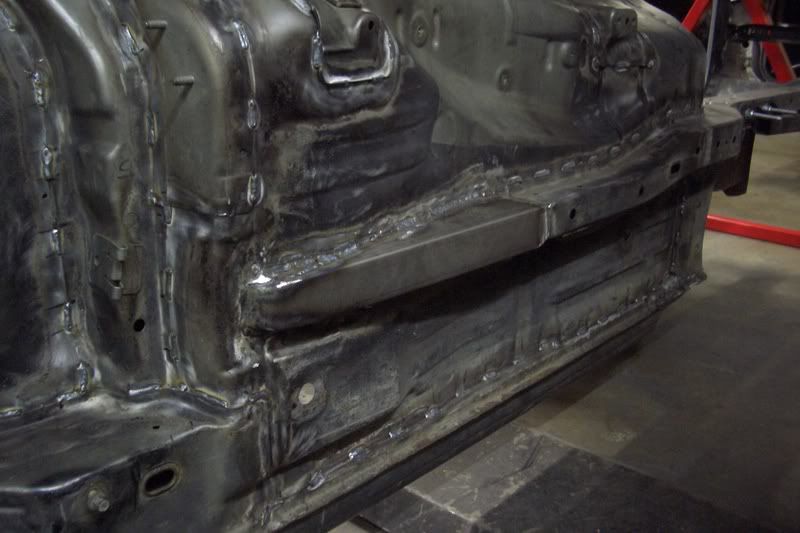
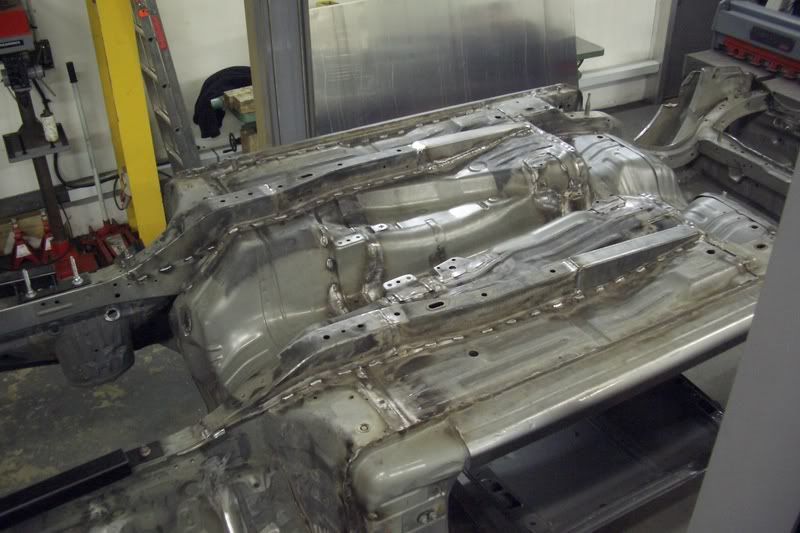
As far as the process and products available some things have changed since this articles better days. ITW Foamseal is no more but a company called FOMO has taken their place. FOMO has also made the 2 part foam kits available via Grainger, so it’s readily available to the public. The part that I have used is #2TE59 and is just over $500 but this is enough foam to do 2 cars. The smaller cheaper kit is actually a different strength foam, so your only option is this stuff but remember two things. Take out everything, I mean everything interior wise that you don’t want to get foam on. Prep and cover all your holes as this is expanding foam and will work it’s way into every small wedge of an enclosure. I plan to do a write-up on this later so keep an eye out. Here is a few pics from my Z32 foam injection experience with Project LOWFATZ. Notice the layout of the seam weld lines and also notice the normally empty section now filled with structure foam to aid in rigidity. 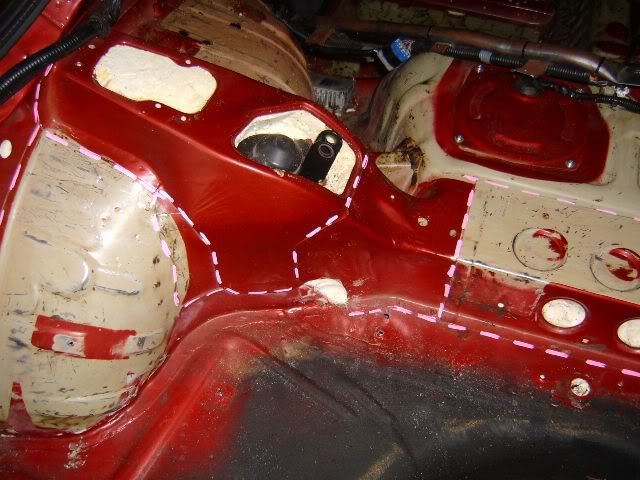
************************* ************************* ********************
Rollcages
Oh, where to begin with rollcages. They honestly should get their own section and post as there are infinite number of rules to follow, starting points and styles. Basically there is way to much to cover on this topic. But I do want you guys to realize that rigidity can be realized as well with a rollcage as this braces many points of the interior together thus adding to rigidity. To me it’s the last step for those out there looking for rigidity since you now know of other options. Unless you are talking a full out race car, the rollcage option should be your last option. If anyone wants an encore for the rollcages, I can throw one together but my brain already hurts from explaining all this already. So no more
 |


 CHASSIS STIFFENING 101 - *redub with self hosted pics* -