It's most likely (99%) the clutch pedal adjustment!
I had a Clutch Masters Cyclone 3.5 installed and it slipped like hell,
especially after warming up. It was down to the fluid going hydroscopic
when the clutch pedal was adjusted too high! (Basically it means the fluid
got hot and expanded throwing out the clutch and making it disengage a
little).
If you have a Pre 1992 300 then your clutch master cylinder may need
changing - The later cylinder has a bigger bore for the fluid and helps
to solve this problem. The Nissan service bulletin recommends changing
this part and the clutch return spring. Only replace these parts if clutch
adjustment fails to fix the problem.
Adjust your clutch pedal so that the engagement is around the middle
(between clutch up and down)... After many adjustments I found the best
position was 1/3 way from the floor. This gave quick engagement and correct
disengagement without crunching the gears, it also cured the hydroscopic
problem.
Advice:
1. If it disengages near the top it's adjusted to high and it may well
slip, especially after warming up.
2. Too near the bottom and it may not disengage correctly and crunch
the gears or even lockup, especially when cold.
3. If the clutch position changes when the car warms up and is exaggerated
when stopping at lights, (it can also feel more hard to press) then it's
still too high.
4. Just two turns on the clutch adjustment nut can make a big difference.
5. Remember how far you've turned the nut and what the results were
in case it needs several adjustments. If only I had done this!
Jez
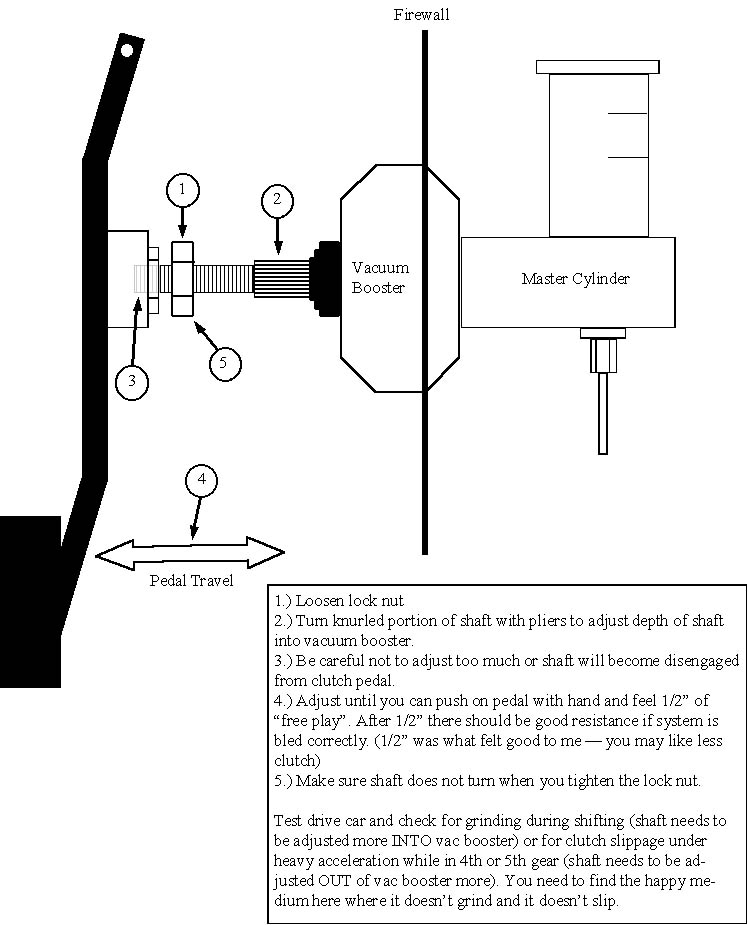
The procedure is best done by laying on your back with your head placed
just below the clutch pedal (so yeah, a good idea to shake the crud off
those floor mats prior to this drill). With light in hand, look towards
top of clutch pedal. There is a clevis with a rod (pointing towards front
of car) and jamb nut attached. Loosen the jamb nut (14mm). See below for
which way to rotate adjusting rod. Note that rod rotation direction is
when viewed from the DRIVERS SEAT perspective.
BEHAVIOR: Engages too close to floor, may grind when putting into 1st
or reverse.
REMEDY: rotate rod clockwise (rod is unscrewed from clevis making it
longer).
BEHAVIOR: Engages too far away from floor, slipping may also be present.
REMEDY: rotate rod counter clockwise (rod is screwed into clevis making
it shorter).
Working room is quite tight and a pair of long needle nose pliers work
nicely for rotating the rod. A little rotation goes a long way so don't
rotate more than several revolutions between test drives. If things are
getting worse you are probably rotating the rod in the wrong direction.
It is sometimes difficult to see if the rod is even turning since you can
rotate it only about 1/10 revolution at a time (due to aforementioned tight
working quarters). Take a thick tip felt pen and place a few marks on the
shaft to help monitor rotation progress. And don't forget to tighten the
jamb nut when through.
Maj
Zedhead


