As for the AIV (air injection valves) 'gurgling', they are in the front
fender wells behind the plastic shielding at the rear of the front tires.
Very few 90-92 ZXs have escaped a failure of these. Symptoms include the
'gurgling' sound at idle that stops just off idle and returns on decel
back to idle. Also the car will fail the idle portion of most smog inspections,
since the ECU adds 7% more fuel when they operate so the extra air they
pump to the catalytic converter has some fuel to burn to keep the cat up
to temp. If the AIVs are not sucking air into the exhaust the fuel just
passes through making things worse then ever. The fix is to try to clean
and align the reeds in the AIVs, replace reeds, or replace the AIVs as
an assembly.
THE Jim Wolf of JWT (from his only known forum post!)
This information was contributed to the IZCC mailing list from Eric
Rahkola:
Here's the steps to follow to fix the gurgling sounds from inside the
front fenders. The Air Induction Valve (AIV) and its air cleaner are located
behind the rear plastic fender linings in each fender. The air cleaner
housing can retain condensation which is the cause of the sounds. In addition
to replacing the air cleaner element, you will most likely need to replace
the AIV valve assembly. It's very easy to do and takes less then an hour
per side. Prices run about $100 for the valve from Courtesy Nissan. [ Note:
Read Jim Klubens' section below on rebuilding the valves instead of replacing
them, Ed. ] The AIV function, as described in the manual, is to send secondary
air to the exhaust manifold using a vacuum created by exhaust pulsation
in the exhaust manifold. When the exhaust pressure is below atmospheric
pressure, secondary air is sent to the exhaust manifold. When the exhaust
pressure is above atmospheric pressure, the reed valves prevent secondary
air form being sent back to the sub-air cleaner. I've heard that de-acceleration
is supposed to keep the assembly clear of water.
Note: I'll be making a TECH page out of this one day,
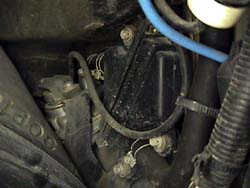
I did snap a picture of the valve assembly inside the fender when I
was in there for a different reason... Admin.
Here's the replacement steps:
1. Jack up the car and remove the wheel. Follow all normal safety procedures
- jack stand, blocks, etc.
2. Locate the removable section of the fender liner. It's located directly
behind the tire tread and measures roughly 18" high x 12" wide. It's embossed
with some 1" high part numbers in reverse.
3. Remove 3, 10mm bolts. Remove the reusable plastic fastener by pushing
its center pin about 1/8" until you hear it click. Use a flat screwdriver
to pry it out. When you reuse it later, remove the pin, insert the fastener,
then push the pin back in.
4. Remove the fender liner.
5. Loosen the clamp and slide off the hose going to the aluminum-bodied
AIV valve. Do the same for the intake hose going into the black-plastic
air cleaner housing.
6. Remove 3, 10mm bolts holding the black-painted bracket assembly to
the car. Remove the 10mm bolt holding
the top of the air cleaner to the car.
7. Move the assembly forward to disconnect the vacuum hose going to
the top of the AIV valve.
8. Remove the assembly from the car.
9. Remove the rest of the bolts holding the AIV valve and air cleaner
housing to the bracket.
10. Remove the 4 screws to open the air cleaner. Note the tab on the
air cleaner and notch on the housing to properly orient the new air cleaner
element. To prevent water from accumulating in the future, drill a small
hold to act as a drain. Lay the intake half of the air cleaner down to
look into the intake hose fitting. I drilled a 7/64th hole in the corner,
45 degrees and about a 1/2" down and to the right of the intake fitting.
When viewed from the inside of the air cleaner housing, this is the lowest
point for water to accumulate.
11. After fitting the new AIV valve and air cleaner to the bracket,
reinstall, in reverse order of the
teps above.
Eric Rahkola
The following information is for the rebuild of the AIV unit contributed
by Jim Klubens (Indy Z Car Club):
With the AIV unit out, follow the procedures for rebuild.
For a diagram of the AIV assembly, refer to the DOCS
section and goto 2-N-06. The Nissan part number from the Reed Valve is
14845-30P00, available from Courtesy Nissan for ~$12 ea.
1. Remove the 4 screw that hold the two halves of the AIV unit together.
(Make a mental note of how the unit comes apart, specifically remember
the two hoses ends. If I am not mistaken, the two ends where the hoses
go on go in the opposite directions.)
2. Remove the rubber assembly that holds the two reed valves in place.
3. Remove the reed valves from the rubber asembly and replace with new
reed valves. Note: It will take 2 reed valves per AIV unit. My personal
experience with the rebuild was I only had to do the drivers side. After
careful examination, the passengers side did not need to be rebuilt.
4. To put back together follow the directions in reverse.
A rebuild of the AIV assembly is very easy and should not take more
than 1 hour per side. I would also advise to clean the AIV assembly during
rebuild.
Jim Klubens


